My simple bread recipe is built on years of home baking. About a decade ago when my kids were little, I thought I’d be a professional baker. I started a weekly loaf program where people pre-paid for a fresh-baked loaf a week and two pizza crusts a month. Life happened and my path diverged from daily baking. However, the skills stick with you. So I thought I’d share what I learned in a long process many years ago.
We are immersed in the year of the baker. Everyone is doing it. I’ve seen people making sourdough starter from twigs and leaves as it turns out that one of the failures of the modern apocalypse is that grocery stores are out of yeast. At least they have plenty of cheap mac-n-cheese. (We all have comfort foods. Mine is cheap mac-n-cheese) This recipe works with yeast or sourdough starter. It’s meant to be a sturdy and flexible loaf that you can make with minimal fuss. It’s great for harvest festivals or turning into rolls to go with soup. One of the things that makes it so great is the way I knead it. Doing it this way minimizes the time and makes it simple to get great bread.
It’s sort of strange. It’s like everyone is trying to be me. They’re all starting gardens and baking, and finding the small joys of home. It’s kind of exciting. I hope that part of the transformation this crisis is inevitably causing will lead to more people finding joy in the small, homey beauty of slow food. It’s a surprisingly radical act.
Ingredients for my Simple Bread Recipe:
- 2 tsp of yeast, or a scoop of sourdough starter, I use about half a cup when I have it.
- 2 Tbs of sugar
- 4 cups of flour (I prefer to use a bread flour, but any old one will do. I have opinions about whole wheat flour; I used to grind my own. If you do choose to use whole wheat flour, smell it. If it smells rancid don’t use it. If you’ve never made bread before I recommend starting with white flour, it’s easier to work with.)
- 1 – 2 Tbs of salt (yes that’s more salt than often recommended. This is bread. it’s good with salt. It’s traditional.)
- Some water. (no there’s no specific measure here. It will be okay. You’ll see.)
- Butter if you want, or olive oil. Maybe half a stick or half a cup. It’s flexible, too.
Equipment:
- A stand mixer with a dough hook if you’ve got one. Otherwise, a bowl and your hands will work just fine.
- A pizza stone or a baking tray of some sort
- A spray bottle that has only ever been used with plain water
First Make a Sponge:
You can use the bowl you’re going to mix your dough in for this. You need one cup of water which is the temperature a baby’s bottle should be. If you’ve never made a baby’s bottle it should be warm, but not hot. Test it with the inside of your wrist. This is how you wake up your yeast babies. Pour the water in the bowl and add the yeast along with the sugar. Mix it all up and let it sit for five minutes or so. This is not an exact science. It is a good time to go to the bathroom or get a cup of coffee. It is too short a time to get into an argument on Facebook. Do not login to Pinterest, your bread will never get made. After it’s sat for just a few minutes it should look foamy. Imagine Buffy from the “Beer Foamy” episode.
Now add just one cup of the flour and mix that in with the yeast. This is your sponge. It will activate the yeast. You can do the same thing with sourdough starter, and this is a good way to make sure it’s plenty active to get a nice rise. You should have a soupy batter that looks like you could make pancakes. Leave this alone for half an hour or so. Now is the time for one or two epic Facebook battles and maybe Pinterest if you’re disciplined.
Next, Make the Dough:
Once you’ve let your yeasty friends get comfy in their bread bath, it’s time to make the dough. At this point you will add your flour, salt, and any addons like caraway seeds, chopped garlic, or olives and any olive oil or melted butter. If it’s your first go with the recipe, I suggest keeping it plain. Now here’s why I can’t tell you a precise water measurement. It depends on too many factors, including moisture in the air, temperature, and moisture content in the flour. You will need some more water. Start working the flour in, either with your mixer or your hands, a cup at a time. When the dough starts to get very stiff, add a quarter to a half a cup of water and keep mixing. The goal is to go back and forth between water and flour to make a nice thick bready dough. It will be sticky at first, and look gloppy. That’s okay. If you want your bread to be more of a sandwich bread keep it a little stiffer with less water. If you want it to be poofier, with big holes, but more floppy like a ciabatta loaf, make it wetter. I like having one bread recipe that I learn well and make adjustments to. That way, I don’t have to take the time to pour over cookbooks. I have the recipe memorized, and I just toss everything together. It’s tempting to try recipe after recipe, but frankly, for home cooking, fresh baked is already awesome.
Don’t waste your time making it perfectly smooth and kneaded at this point. Once it’s mostly mixed and at about the right consistency, put a wet towel over the top and just walk away. Don’t look back. Go login for work or demand justice for Breonna Taylor.
First Rise:
The first rise takes the longest, probably a couple of hours. If your house is hotter, it will rise faster. If it’s cooler it will rise slower. While you’re busy being useful, your bread will be transforming. The gluten gets all tight and stiff when you knead it, like a knotted muscle. By leaving it be, the gluten relaxes, and as it rises, it slowly begins to form the long molecular chains that make great rising bread. If I have the time, especially if I’m making a wet dough I will encourage this by giving it a quick knead after the first half-hour or so. You know your bread is done rising when you press a finger into the dough and the imprint doesn’t start filling in immediately. Yay first rise!
Now if you want to get fancy and bring out the delicious flavors of the bread, you’ll want a cooler rise. Just like with lactofermentation, cooler = better. If you have a cool place in your house, and you put your bread there the rise will take longer, but that also gives more time for all those little mini-friends we know as yeasts and happy bacteria like lactobacillus to proliferate. Your bread will still taste good if you don’t. But especially if you want to maximize your sourdough flavor, a cool rise is key.
Second Rise:
Once your first rise is done, your bread dough should be looking pretty bread dough-like. Knead it a bit more now, and you’ll really be getting some great long gluten chains. Another trick: adding butter. While you’re kneading, take a couple of pats of cold butter and smear them on your work surface, then knead the dough on top. You will be adding butter to your bread (delicious!) and you also will be getting even longer gluten chains. This is a trick I learned from obsessively reading French baking books. Make it into a round, put a damp cloth back on top and you’re done. It should take about half the time to rise this time.
Final Proofing:
Once it’s risen again, it’s time to shape your loaf. Depending on how wet your dough is, this can be easy or hard. If you’re doing sandwich bread, butter a loaf pan, make it loaf-shaped, and plop it in. If you want a boule shape (that’s just French for “ball”) take your dough and start tucking the edges underneath. It’s sort of like tucking a sheet into a bed. You just go around and around until you have a nice smooth surface. You can put this on a plain tray, or you can use a pizza stone. Either way, dust the pan or stone with cornmeal or some flour to keep it from sticking. Wherever you put your loaf, this is the thing you’re going to bake it in or on. Let it rest, covered, one more time, about half an hour to an hour.
Baking Your Bread to Maximize Crust:
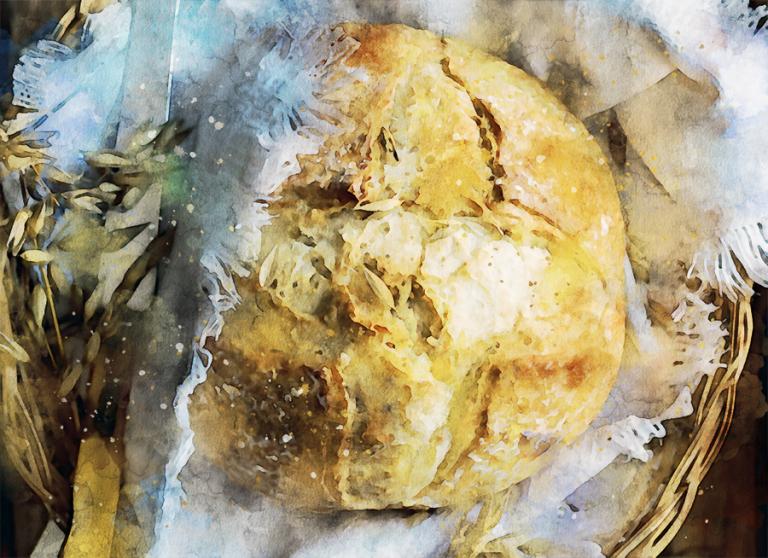
First, preheat your oven to 400 degrees. I know that’s hot. It’s okay. You’re mimicking a wood-fired oven, which starts hot and gets cooler. Next, go find a razor or a really truly sharp knife. If you do use a razor blade, wash it carefully with soap and water first. Slash the top of your loaf. Be authoritative. Do. Not. Saw. It. Make a pattern or just do one long slash across the top, it’s your choice. This allows the last huzzah of the partying yeasts someplace to shove the poofy bread. There’s a real art to doing this well, so don’t despair if you don’t quite get it the way you wanted the first time.
Then you put your bread in the oven. Have your water bottle of clean water handy. After you put it in the oven, spray the bread and tray with the water bottle. You will get steam as the water hits the hot oven. This is what you want. Fancy bakeries have steam injected ovens that do this perfectly every time. The steam is what develops the crust and also helps the bread rise just a little bit higher. Bake the loaf at 400 degrees for a half-hour, quickly spraying water about every ten minutes. This is probably the most acrobatic part and involves me triumphantly slamming the oven door closed after just a couple of seconds of spraying water. It can really make a difference in your loaf.
After that, turn the oven down to 350 degrees, and bake for 45 min – 1 hour. when it looks crusty and golden, pull it out and check it by flipping it over and knocking on it like it’s a door. If it sounds hollow it’s done. If it sounds dull and thumpy, toss it in for another 20 minutes. In general, it’s better to overbake a loaf than underbake, so err on the side of more time.
After that, the main thing is to attempt to wait till it is mostly cool before slicing in and applying butter, jam or other toppings. My family is always horrible about that waiting part, which ends up with a lot of burned fingers, melted butter and happy faces. I hope my bread recipe inspires some new ideas and helps you get the most out of your baking time. Good luck with your bread efforts, and remember to take a moment to give thanks for all that you have, including the time to bake bread.

Connect with me: