As regular readers may know, I am in the middle of a master’s program in Economics, so these past two weeks have been more of a “real vacation” than usual, and, rather than working on a puzzle, as I do occasionally, I created a “fabric art” project.
I am by no means an artist, and the end result is by no means perfect, but I wanted to write out exactly how I did it, for what it’s worth, and to recall for later.
First, here’s the final result:
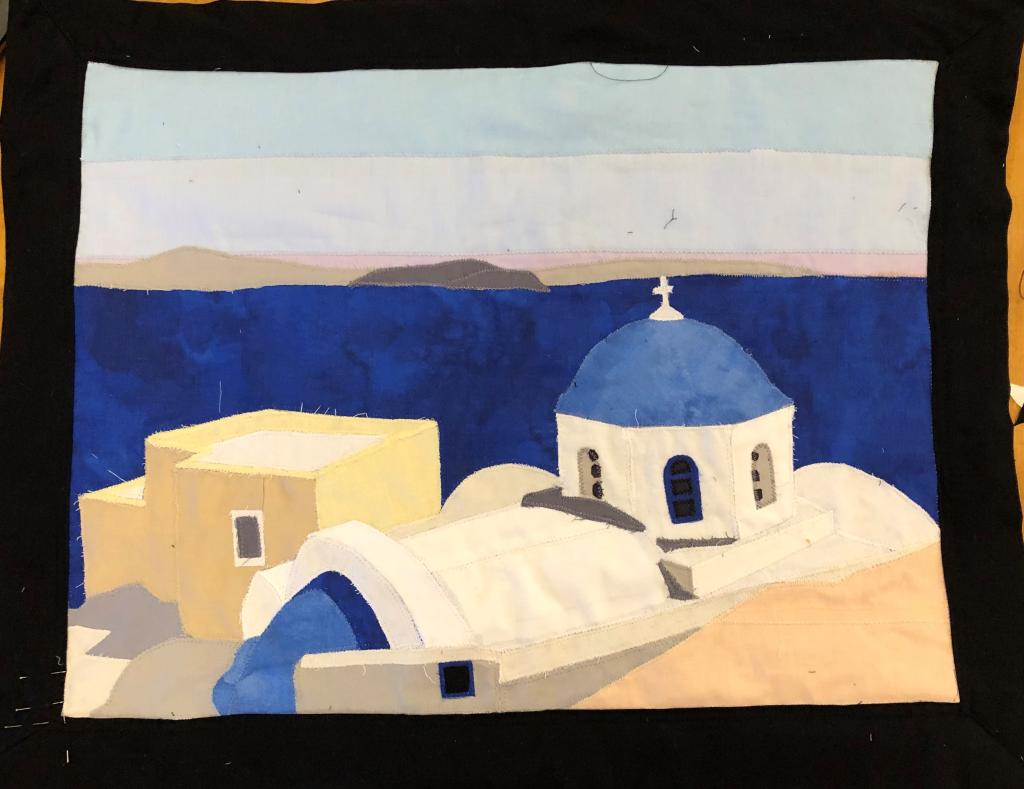
Yes, there are a few pins in and a few threads I need to snip, but I wanted to finish writing this up, so this is as good as you’re going to get for now.
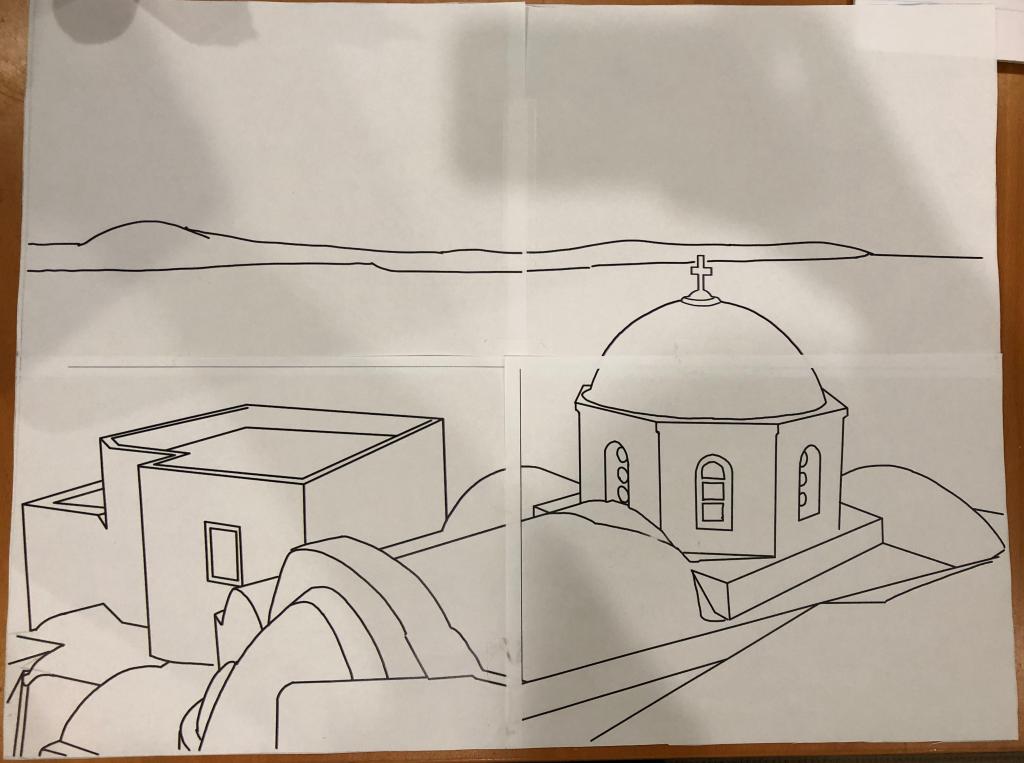
It was based off of this photo from our cruise in 2019, at Oia on the island of Santorini.

To create the artwork, I first enlisted my son’s help. He used an app on his iPad to trace the outlines of the picture, in a somewhat simplified manner (the app creates straight lines and smooth curves). He then expanded the size to fit onto 4 8.5 x 11 sheets of paper, printed it out, and taped the pages together.
We then traced this picture twice, first onto the non-coated side of freezer paper and second onto a piece of light grey fabric. (In hindsight I might have used white, but light grey was what I had in the right size in my fabric box.)
We paid a visit to JoAnn to select fabrics, and found two fabric rolls and a 5-pack of fat quarters that fit the bill. I again enlisted my son and we picked out colors together.
Then, using a method described online in various spots, I cut out the freezer paper tracing into its constituent parts. Except for the sky, which was just three strips, I followed the method of (1) ironing the freezer paper cut-outs onto the right side of the fabric, (2) cutting out the fabric based on the freezer paper pattern, (3) tacking the fabric onto the base fabric using the traced outline, and (4) sewing the pieces using a zig zag stitch.
There are a couple things I learned that I would change for next time. First, I wasn’t entirely happy with the look of the sky-strips when it all came together, so I would have tried to give them some more shape/pattern. Second, I would have tried to layer it better, rather than fitting everything together puzzle-piece style, because this meant there were some gaps that were fussy to deal with. And, third, the grey background meant that the white was not as white as otherwise — I ended up in some cases doubling-up with two layers of white to compensate instead. I suppose to some extent this better replicates the shadows and the fact that the church isn’t entirely bright white, though. I should note, though, that unlike a “classic” applique, I did not use a satin stitch, in part because this seemed tedious and also because I wanted the stitching to be somewhat less visible, especially as it wasn’t always a perfect match (I hunted around in my bin of thread for close matches).
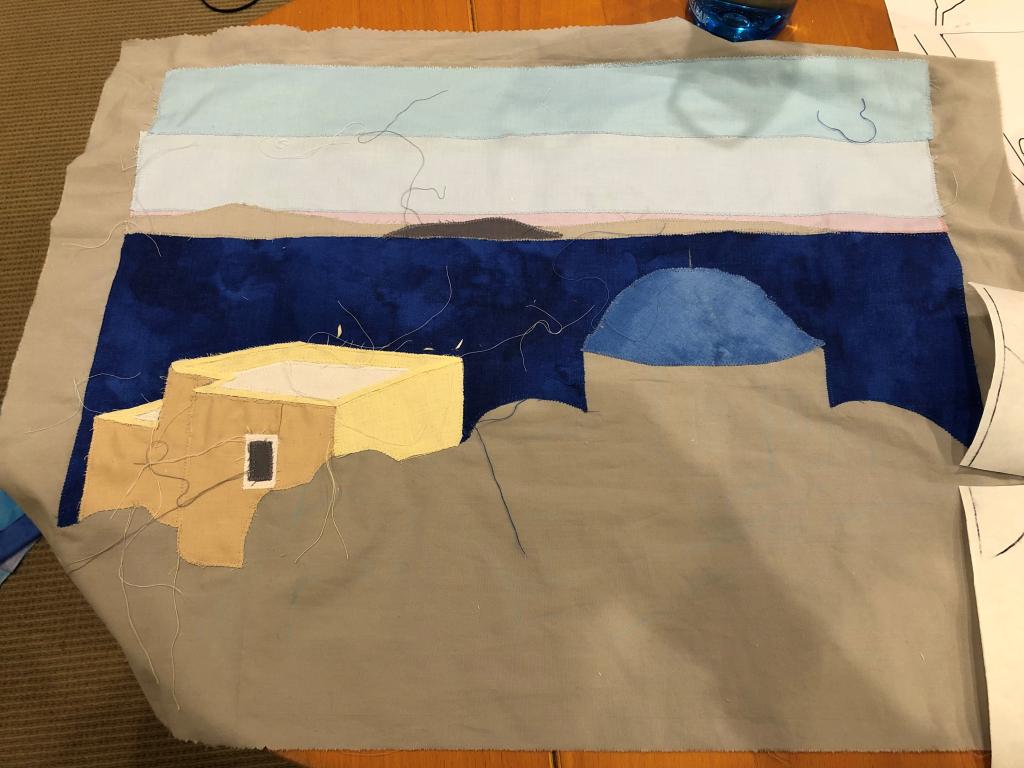
This is what it looked like partway through.
I also had thought I would add some details with stitching, but once the sewing was finished, I was nervous about messing it up so didn’t do so.
To finish it and prepare it for hanging, I looked at examples of wall hanging-style quilts, but did not want to do a full “quilt” approach. I measured the necessary dimensions for a 2 inch border, and took an old white sheet and cut two rectangles of the same dimensions as well as a black sheet which I had been using for face-mask-making, and sewed those three pieces together (around the edges and at both diagonals) to make a quilt-like backing.
For hanging, I measured out a strip of the black fabric with the right dimensions to make a “sleeve” to slip a dowel in, covering nearly, but not entirely the length of the project, and sewed it to the back, at the top.
Then I measured the top of the sheet, the folded over/seamed part, that is, and concluded that it was the right length/width for a strip for the “frame.” I cut it, then pressed in the ends to make a strip two inches wide, with a half-inch folded in and pressed. I pinned this all the way around (readers, it fit precisely — though if you look closely, the pinning wasn’t perfect in the corners), and sewed two straight seams, one right at the edge, the other half an inch in, and out and in again at the corners. (It’s black thread and black fabric so painful when I needed to rip part of a seam due to a mistake but that means that the seams are fairly invisible.)
And there it is. It was a fun project and it’s definitely something I would like to try again with another picture and with my picture-tracing assistant, hopefully improving the result the next time around. And for the first time in a long time, I felt like I made something I’m pleased with, when I’ve struggled to find “crafty” things to do, in this world in which all the ways our mothers or grandmothers would sew for the family, make stuffed animals, etc., are rendered much less useful with modern automation.