Ever create something that just doesn’t work anymore?
Have you ever had to break up with a light fixture?
When our kitchen island light wasn’t working for our space, we needed a simple and affordable option, so we built a Pallet Light Box for less than $50. I am thrilled to be sharing all of the step-by-step details with you! If you have an awkward space that needs lighting, or an off centered fixture, this is definitely the post for you.
When we renovated our kitchen, I was given a gorgeous, emerald green enamel light shade that I loved, and still do, but it just wasn’t working with where I had placed it.

Yummy Enamel light – it’s not you, it’s me!
And this isn’t good-bye, just a see you later until you have a new home.

Our kitchen is dark. I mean gloomy-on-a-shady-day kinda dark. Over time, we realized that the pendant light wasn’t bright enough and the enamel blocked the light from bouncing off the ceiling which would brighten the room.

When we started to replace our kitchen floor and upgrade our Pallet Kitchen Island, we were left with lots of scraps. So what to do with that left over pallet wood? That’s right! Build a light box! By reusing materials and never letting anything go to waste, it can save you lots of money.
Here are the materials we used:
- Pallet wood pieces
- Allen Roth lighting fixture
- Deck screws
- Anchor screws
- Carpenters Square
- Power Drill
- Circular Saw
- Stud Finder
- 1 1 x 1 pine baluster
When we found this light fixture from Allen Roth at Lowe’s, I immediately fell in love with it because I can change the glass shades to mason jars if I want. The glass pendants were perfect to allow the light to fully shine through, but I didn’t want them clustered together. The challenge was separating the clustered lights to be spread across the length of the kitchen island.

Here’s how we did it:
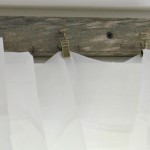
The first step is to build the box. Most pallets are constructed with a 2 x 4 frame and slats of varying sizes. We like to use wood from the same pallet for uniformity, but there are no hard and fast rules with this – be creative!
I loved the slats with the imprinted numbers, and wanted to show them off, so they became the end pieces. A carpenter’s square is handy to ensure that the box is even.

Since it is pallet wood, your pieces do not need to be perfect or straight. Trim the wood to your specifications using a circular saw and don’t worry about perfection.
By adding the slats of wood to our box top, we basically built a mini-pallet.

What I love about pallet wood is the weathered, aged aspect.
The old holes where the nails were just add to the charm and are what we used to screw the box together.

Now it’s time to affix the box to the ceiling. We cut the 1 x 1 baluster in half and used them as braces. This is what you will screw the box to so make sure your box fits snug around the braces. Use a stud finder to find the joists in the ceiling and screw them in. In our case, there wasn’t a joist on one side, so we had to use heavy duty anchor screws.

Next, we needed to wire the box and separate the cluster of lights. Another thing I loved about this light fixture is that it allows you to choose your lengths and is easy to disassemble into 3 separate cords.
We drilled holes big enough for each cord to feed through the light box.
We just knotted the cord to the length that we wanted to hang the pendant lights.
The awesome thing about the light box is that we were able to keep the length of the light cords in case we ever wanted to rehang this fixture someplace else. All that extra cord is stowed away in the box.

Then we attached the cords to the base plate of the fixture. Since I’m not an electrician and I don’t play one on TV, I’m not going to give instructions on this step. This is an important and potentially dangerous step, so have someone who knows what they are doing to help with the electrical, or be sure to educate yourself.

Finally, we fit the box around the braces, holding it tight to the ceiling, and screwed the sides of the light box into the braces.

That’s it!
Easy peasy, done in one afternoon and swoon-worthy!

I love the random stamped sides, adding that true pallet character to the box.


For now, I’m keeping the clear shades, until I find vintage, wide mouthed mason jars.


So our kitchen island is a bit bare, but will be revamped to match the rest of the cabinetry. And as you can see, we are in the process of finally covering that floor and I can’t wait until the final reveal!

I love that I was able to create an easy, budget friendly light fixture that solved so many issues. No more dark, dreary kitchen, lots of light over our revamped kitchen island, and a unique piece that is a definite conversation starter when company comes!
Do you have any pallet wood lying around and have been searching for inspiration? I’d love to hear if this inspires you to create your own light box! Be sure to keep up with me on social media and show me your creation!


I share with these wonderful people.
Purchases:
Vallymede 7.7-in Aged Bronze Hardwired Standard Multi-Pendant Light
Utilitech 6-Pack (60 W Equivalent) Warm White Indoor LED Bulb