What is it about itchy burlap that feels like fall? This time of the year, most Arts and Crafts stores are filled to the brim with Fall decor and a lot of it has some element of burlap. When I was out stocking up on some deals, I saw a gorgeous, gathered burlap garland that I knew would be perfect for Fallifying my Almost Farmhouse fireplace, until I saw the price tag!
$35!! Yikes!
It was when I turned the corner and saw piles of burlap ribbon that I knew I could figure out a way to make my own and save lots of money. Today I’m going to share how you can make your own Burlap Garland with this quick and easy tutorial!

Here are the supplies you need:
(affiliate links provided below if you want purchase online)
Burlap Ribbon (without wire)
Yarn Needle
Twine

First, we need to knot the twine. I made a looped knot in my twine for the end so I have the option of hooking it to something if I want. Make sure the knot is large enough to cover the holes of your burlap. It can easily slip right through if the knot is small enough. Thread your yarn needle. You want your length of twine to be a bit more than the desired length of your garland. My garland was about 6 foot in length, so I cut my twine around 7 feet.
For my burlap garland, I wanted to create a dense, gathered look, so I folded my burlap in half before feeding the twine through the burlap. If you want a more ruffled look, you can leave your burlap ribbon as is.

Next, you feed your needle through the burlap in a zig zag pattern, basically folding the fabric on top of itself. I piled a bunch of burlap folds on my needle and then pulled through. You want to gather your burlap as you go for uniformity. This is simply done by pulling the twine and scrunching down the ribbon.

Repeat the process until you reach your desired length. To finish off your burlap garland, copy the same knot you started with on the opposite end.
Easy Peasy!! I think the entire process took me less than 10 minutes. *Tip* Don’t wear your black knit yoga pants like I did while doing this. I was covered in burlap shedding!

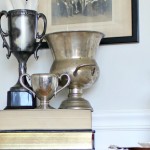
My burlap garland looks so pretty perched on my mantle! And, bonus!! You are seeing a sneak peak of my painted pumpkins I’ll be sharing later this week. Make sure you are following me so you don’t miss the next post!
This is such an easy way to Fallify your nest for less with with some DIY Burlap Garland. Be sure to comment below and let me know if you are inspired to create! Here’s an image for y’all to pin if you want to save this for later:

If you want to purchase supplies online, click the affiliate links below: