I just have to share this because usually I’m not a crafty person. First of all, I’m not terribly creative with “artsy” stuff. Those genes went to my sister Trish, who is an accomplished artist . Second, I often do not finish what I start. ADD and all that. So when I came up with an idea to make frames for my crochet work, I was tickled to be able to follow through and do it.
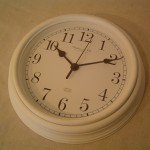
So, here’s the thing. I am crocheting, and I have done several doilies lately. Doilies tend to be circular. Picture frames tend to be rectangular. Square would be okay, but rectangular, not so much. I googled around trying to find round picture frames, and they are less common and can be quite expensive. So I thought to myself “Self, what’s round and hangs on a wall and looks good?” A clock! Clocks come in all sizes. They are the requisite round shape. Could they be taken apart and jazzed up? Hmm. I started looking for clocks in the thrift stores but didn’t find one that fit the bill. Then I was in a local megamart and I saw a perfect little clock that only cost about $4. I bought it, bought some yellow paint to match some speckles in my doily, and took it home.
It took a couple of days for the concept to percolate in my brain. That’s how I do stuff. I don’t jump in right away, but rather I let the ideas ooze around in my brain for a while and then see what trickles out. Kinda like mental post nasal drip, but not gross. So, I did, and then yesterday afternoon I had a few free minutes. Grabbed my doily and my stuff. Went to the office. Grabbed a screwdriver and started pulling apart the clock, and then painted to obscure the numbers and stuff on the face, put the doily in, and voila! Instant doily frame! Here’s the process:
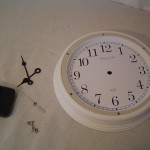
Step One: Buy a clock

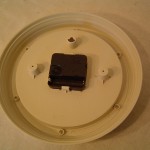
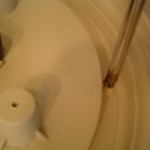
Step Two: Turn over clock, unscrew the screws, which free up the little band on the front that holds the glass in place, then pop out the mechanism of the clock, which makes the hands fall off
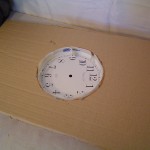
Step Three: Make a cardboard mask so when you spray paint the face you don’t get a lot of overspray (in future I think I’ll use a brush instead of spray paint as I am sloppy and it’s hard to mask so I don’t get paint in the wrong place. Live and learn!

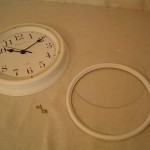
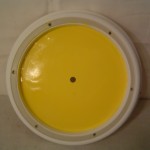
Step Four: Paint the face of the clock to obscure the numbers. Obviously, you want to buy a clock with the numbers just printed on and not glued on as that would be too tedious to fix up. I just ignored the hole in the middle as the doily would obscure it.

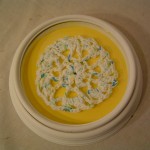
Step Five and Six and Whatever: Place the doily (which should be ironed and maybe spray starched to make it lie flat) in the middle of the frame, securing with a glue gun. Replace the glass and then the little thin frame that holds the glass in place. Screw the screws back in, and you are done! One lovely little picture frame for your doilies. This one was done with a small doily but if you can find a clock big enough (I will continue to scour the thrift stores), you can do this for big doilies also.