Thank you to the wonderful people from The Shade Store for partnering with me on our Master Bedroom makeover!
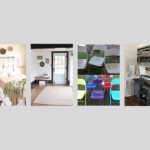
Well, here we are friends – halfway through the One Room Challenge from Calling It Home and progress is coming along! This week is all about my windows and how I dressed them up!
One big change we planned to make to this room were the addition of woven shades. When we had our shades installed for our Family room, I was amazed at how beautiful they looked and I knew I wanted them for our bedroom.

Years ago, when we lived in a rental, the landlord had cheapy blinds in the windows. Not only was the cord always getting tangled and the edges fraying, but they looked awful! I knew that we had to invest in quality blinds and that they would last longer making them more cost effective.
We got these gorgeous wood shades from the wonderful people at The Shade Store.

The window sizes were exactly the same as the Family Room, so I knew how they would look. We went for the Standard Woven Wood Shades in the Fair Harbor-2 color. For our large picture window, we ordered the shades with multiple shades on one rod. I was concerned that the weight of a single shade would be difficult to raise and lower with our large window.
Plus, I loved that it gives us the option to raise or lower one side at a time if we’d like!

The helpful customer service rep was so kind to assist me with the best options for my windows and she recommended the continuous loop cord, which is a silver chain that maintains a consistent length and is easier to operate larger shades.

I just love the weave on these shades! It is so beautiful!

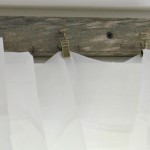
I left my curtain rods in place from my previous panels, but knew I had to be budget smart for the draperies. I reused the old curtain panels by simply removing the blue silk and replaced them with twin white flat sheets.


Don’t they look so nice against those beautiful woven shades?
It was such an easy DIY – just an afternoon, an iron and some stitch witchery.

And to not leave you hanging with suspense – the progress on the closet is coming along too!
We finished the install on the floors. We had left over scraps from our Hardwood install years ago that we had saved and we finally installed them!


We have yet to fill the holes and seal them, but progress is progress!
Trent came up with a great idea to install a mirror case in his closet, so that build has been a little side project, but so much fun!

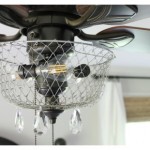
And one last thing to share this week is how I transformed our ordinary ceiling fan into something extraordinary! I’ll be showing the full tutorial in the next few days!


The One Room Challenge Plan
- Converting the 1/2 bath into a closet
Opening the Wall and adding a doorSealing the other Wall- Replacing the flooring – almost finished!
- Build a DIY closet system with a bench
- Adding a mirror – in process
- Moving the light
- Glitzing up and feminizing the existing walk-in closet – in process
- Replace the bathroom door with a DIY barn door – in process
Hang woven shades in windowsReplace curtainsModify the ceiling fan into a Farmhouse style fan- Replace the lamps – purchased
- Find new side tables – switched out from other rooms
- Paint the existing dresser (I’m still undecided about this)
- Adding a reading nook so I have a quiet place to escape to
- Create DIY artwork
We’re chugging along, but, boy, do we need to kick it into high gear! We have quite the workload ahead of us, but I still feel confident that we can get this finished in time. Be sure to follow along to see what we get accomplished in the next week! And head over to Linda’s site, Calling It Home, to see all the other amazing rooms being transformed.
To see our design plans for this room, check out my previous posts:

I’d love to hear from you! Scroll down to the bottom of this post to leave me a comment.
Or find me on your favorite social media and tell me there!
{Instagram} {Facebook} {Twitter} {Pinterest} {Google +}
I share with these wonderful people.